
Baking successfully with whole-grain flours requires putting them at the center of each recipe, rather than thinking of them as add-ons, and Tabitha Alterman shows you how to do just that in Whole Grain Baking Made Easy (Voyageur Press, 2014). From mainstays, such as wheat and rye, to less-common choices, such as amaranth and teff, learn how to craft more than 50 mouthwatering recipes by following the simple instructions and beautiful full-color photography throughout this guide. The following whole-grain bread recipe is from chapter 5, “Yeast and Wild Yeast (Sourdough) Breads.”
Infinitely Adaptable Whole-Grain Bread
Compared to the ingenious no-knead bread method, these breads take a little more (though still not much) active, hands-on time. I’ll be honest: these loaves do require minimal kneading, and you’ll dirty a few more dishes. Still, I love this technique, because it coaxes more flavors, more enzymes, more nuance, and better texture from your loaves.
The no-knead method works incredibly well with white flour and pretty well with whole-grain flour, but if you want to maximize the nutrition and showcase the deepest possible flavors of whole-grain breads, this method is the winner.
This method can also become just as adaptable to your lifestyle as no-knead bread baking. But again, I’ll be honest: it won’t feel like it at first. You’ll read the steps and think there’s a lot going on here. But after two or maybe three turns at it, you’ll have a feel for the best way to fit the steps into your life–where to speed things up, where to slow them down.
Besides turning out more complexly flavored loaves of bread, the Infinitely Adaptable method teaches you some useful baking skills.
Basic Whole-Grain Bread Recipe
A homemade loaf of bread is a great place to sneak some specific nutrients that you may be lacking into your diet. For health-promoting ideas, refer to the Whole-Grain Flour Glossary.
This variation on basic whole-wheat bread replaces 1 cup (125 grams) of whole-wheat flour with 1 cup of the favorite flour(s) of your choosing, with half in the soaker, half in the sponge.
A few flours have specific personalities that you should be aware of. For example, barley, oats, rye, and spelt soak up a lot of moisture; and rye and spelt do not like to be overkneaded. For more about individual grain personalities, see the Whole-Grain Flour Glossary.
Yield: One 1-1/2-pound (3/4-kilo) loaf
Ingredients for Soaker:
- 1-1/4 c. (160g) whole-wheat flour
- Approximately 1/2 c. (60g) favorite whole-grain flour, or a combination
- 3/4 tsp. (4g) salt
- 3/4 c. (170g) buttermilk, kefir, or yogurt (dilute extra-thick yogurt with water until pourable)
- 2 tbsp. (28g) orange juice
Ingredients for Sponge:
- 1-1/4 c. (160g) whole-wheat flour or unbleached bread flour (Note: Whole-grain flour absorbs more liquid than white flour. When adding liquid to bread dough, especially if you have changed the flour composition, it’s wise to add it a little at a time so you don’t overdo it. You can always incorporate more liquid later)
- Approximately 1/2 c. (60g) favorite whole-grain flour, or a combination
- 1/4 tsp. (1g) instant yeast
- 3/4 c. (170g) cool water
Ingredients for Final Dough:
- Soaker
- Sponge
- 2 tsp. (6g) instant yeast
- 2 tbsp. (36g) honey, molasses, brown sugar, or other sweetener
- 1 tbsp. (14g) unsalted butter, melted and cooled
- 3/4 tsp. (4g) salt
- Extra whole-wheat flour and water, for adjustments
The Day Before Baking
Choose a whole-grain bread recipe to determine your soaker and sponge ingredients. Steps 1 and 2 can happen up to 3 days before you plan to mix bread dough, but be sure to do them at least 6 hours before you plan to bake.
Mix soaker. Mix ingredients together. Cover and leave at room temperature for 6 to 24 hours. (You may also make this a few days before baking, in which case it should be refrigerated. Be sure to bring it to room temperature an hour before mixing dough.)
Mix sponge. Mix ingredients together with wet hands or a stand mixer with its dough hook attachment. Knead or squeeze dough for about 2 minutes, then let it rest for 10 minutes. Knead again for about a minute. Cover and refrigerate for at least 6 hours. This can also be done up to a few days before use. (Note that you need to remove sponge from refrigerator about an hour before mixing dough.)
The Day of Baking

Mix dough. About an hour before you begin mixing bread dough, remove soaker (if it has been refrigerated) and sponge from refrigerator to allow them to come to room temperature. Add soaker and sponge, in alternating spoonfuls or handfuls, to the bowl of a stand mixer fitted with dough hook attachment (or a large bowl, if mixing by hand). Mix on low speed (or with wet hands or a dough whisk), just until everything comes together. Sprinkle yeast evenly around bowl. Add remaining ingredients called for in the recipe except honey, butter, and salt. Mix on first speed 2 minutes. Increase to second speed and mix another 2 minutes. Add honey, butter, and salt, and mix 2 minutes more. Let dough rest in bowl for 10 minutes. On a lightly floured work surface, knead dough by hand for just a few minutes, adding extra flour and water as necessary to create a soft dough that is strong enough to resist pulling yet is still malleable. Take care not to overknead if dough contains rye or spelt. Dough initially feels loose and sticky but gets stronger and more cohesive through resting, kneading, and shaping.


Turn dough out onto floured work surface. Using a dough scraper or flexible spatula, transfer dough to work surface in one piece. Let it rest for a minute. This allows gluten to relax, but also allows you to take note of the dough’s structure. (If it seems strong and cohesive already, take care when shaping not to overwork it. If it seems slack and tears as you stretch, you may want to give it extra stretching folds before final shaping. If it’s extremely slack, it’s probably best to incorporate some more flour as you fold and shape, although generally you do not want to incorporate any more raw flour at this point.) After dough has rested for a minute, pat it lightly into a rectangle. Fold left side of dough over middle, then right side of dough over middle (like folding a piece of paper in thirds). Let dough relax for a minute. Now fold top of dough over middle, then bottom of dough over middle (again in thirds). Let dough relax again for a minute before repeating this “business-letter” folding process.

Bench rest. Rotate dough on an unfloured portion of work surface until a more-or-less round ball has been shaped; it does not need to be perfect. Cover loosely with a slightly damp towel to prevent surface crust from forming. Allow it to rest on a counter, or bench, for 10 to 20 minutes. The tighter the ball, the longer it will need to rest in order to relax enough to be shaped.
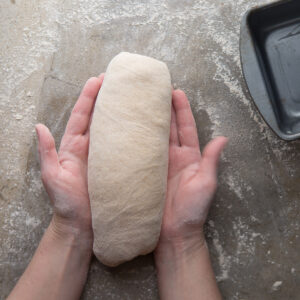
Shape dough. To form dough ball into a sandwich loaf, pat it into a rectangle, and roll it into an 8-inch cylinder. Tuck the ends in and under. It doesn’t need to be perfect. The loaf pan will help it spread out. Place loaf in a greased 8-1/2-by-4-1/2-inch loaf pan or into a Pullman pan or other covered loaf baker. (Larger loaves can be baked in a 9-by-5-inch loaf pan.) Press any optional toppings gently onto top of bread.

Prepare to bake. Preheat oven to 450 degrees Fahrenheit (232 degrees Celsius).

Final rise. Cover loaf pan with a floured towel, slightly damp towel, or oiled plastic wrap to prevent surface crust from forming. Allow to rise at room temperature for about 45 minutes. Again, it should be about 1-1/2 times its original size and feel pillowy. You may interrupt this process by retarding shaped dough in the fridge, but remember to add about 20 minutes to its remaining rising time when you remove it. (If you retarded it during the first rise (Step 4), it’s best not to do it now.)

Slash loaf. Lightly mist or brush top of dough with water. With a swift, confident motion and a sharp, serrated knife or lame (bread-slashing tool), quickly slash top of loaf with a 1/4-inch-deep cut down the middle. Slashing creates a place for the dough’s gases to escape. If you don’t do this, the dough will not rise to its fullest potential, and it will decide where to puff up all on its own. It probably won’t be pretty.

Steam oven (optional). For a crisp crust and higher rise, humidify your oven.

Bake bread for about 40 minutes, reducing heat to 375 degrees Fahrenheit (191 degrees Celsius) after the first 10 minutes. If your oven has hot spots, rotate pan 180 degrees about halfway through baking.
Let the bread cool on a rack for 1 hour before slicing.
More from Whole Grain Baking Made Easy:
• Whole-Grain Flour Glossary
• How to Make Homemade Flour

Reprinted with permission from Whole Grain Baking Made Easy: Craft Delicious, Healthful Breads, Pastries, Desserts, and More by Tabitha Alterman and published by Voyageur Press, 2014.


